


At the moment, the world has been made more brilliant by the rapid advancements in technology. New devices and ideas have risen continuously, thereby improving the prevailing technologies and generating new market sections. Similarly, Bluetooth technological advances have contributed to the birth of Bluetooth Low Energy (BLE), also referred to as Bluetooth Smart. The Bluetooth Low Energy is a short-range, low-power with a less-data-rate wireless communication protocol developed by the Bluetooth Special Interest Group (SIG). Its encrusted protocol stack is designed in such a way that it competently transfers insignificant amounts of data with less consumption of power. Due to this, Bluetooth Low Energy is the most preferred wireless protocol for battery-operated applications. This article will explore the technical features of Bluetooth sensors, how to connect and use Bluetooth sensors, how Beacon sensors can be used for business, and how to read and control sensor data in Arduino using Bluetooth.
How to Transmit Data using Bluetooth Beacon sensors?
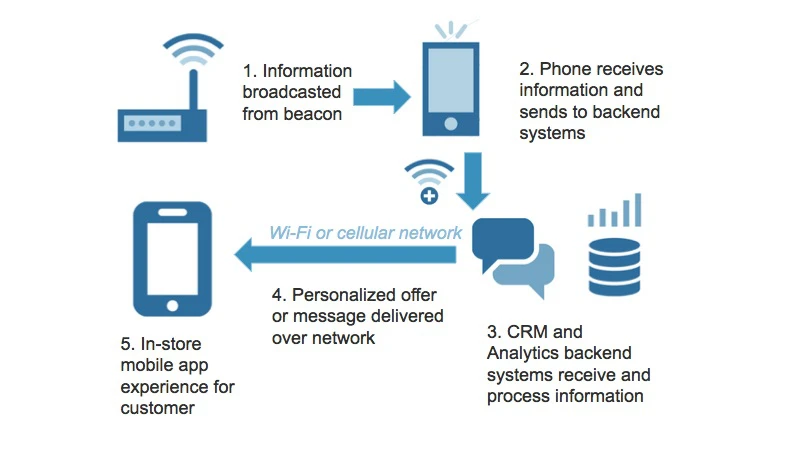
Bluetooth Beacon sensors are small transmitters that broadcast signals to close portable devices using Bluetooth Low Energy technology. They have an action range of around 90 meters and can only transmit data but cannot receive it. Once the sensor detects the nearby devices, it sends digital messages to the targeted devices. Currently, beacons are used proportionally with mobile applications. These mobile applications obtain a unanimously unique identifier to perform several functions, such as triggering a location-based action and tracking customers.
Technical Features of a Bluetooth Sensor
a) Radio interface
The Bluetooth IoT sensors work with the same spectrum range of between 2.400–2.4835 GHz ISM band as classic Bluetooth technology. The only difference is that Bluetooth Low Energy uses a different set of channels. It has forty 2-MHz channels, whereas classic Bluetooth has seventy-nine 1-MHz channels. The Gaussian frequency shift modulation is used to transmit data within a channel in the BLE technology. It has a bit rate of 1 Mbit/s but with an option in Bluetooth 5 of 2 Mbit/s. Also, it has a maximum transmit power of 10 mW and 100 mW in Bluetooth 5.
b) Advertising and discovery
Bluetooth Low Energy sensors are spotted through a technique based on broadcasting advertising packets. It is usually done using 3 distinct frequencies to decrease interference. The advertising device sends packets of not less than one of the three frequencies with a repetition period termed as the advertising interval. In each advertising interval, there is an addition of a random delay of 10 milliseconds that reduces the chance of numerous consecutive collisions. The scanner attends to the frequencies for a period termed as the scan window, which is occasionally recurrent after each scanning interval.
c) Battery impact
Bluetooth Low Energy sensors are specially designed to work even with shallow power consumption. Various power necessities are required for devices with central and peripheral roles. A study conducted by a beacon software company Aislelabs conveyed that computer peripherals, for instance, propinquity beacons, regularly function for up to 2 years using a 1,000mAh coin cell battery. The Bluetooth Low Energy protocol makes this possible due to its power efficiency. BLE transmits small packets; hence it’s ideal for high and audio bandwidth data compared to Bluetooth Classic.
d) 2M PHY
A new doubled symbol rate transmission mode has been introduced by Bluetooth 5. Initially, Bluetooth Low Energy sensors only transmitted 1 bit per symbol, but with Bluetooth 5, they can data with double rates. However, the new transmission mode pairs the bandwidth to 2 MHz from about 1 MHz, making more intrusions on the edge areas. The ISM frequency band segmentation has 40 channels with a spaced distance of 2 MHz, which is essentially different from the Bluetooth 2 EDR.
e) GATT operations
The GATT protocol is essential to the user as it offers several commands regarding the discovered information about the server. These commands include:
- Discovering UUIDs for each principal services
- Finding a given UUID for every service
- Finding subordinate services for a given principal service
- Discovering every feature for a specific service
- Finding features that match a specified UUID
- Reading all signifiers for a precise distinctive
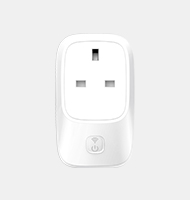
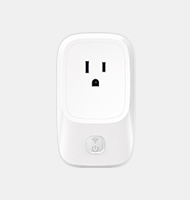
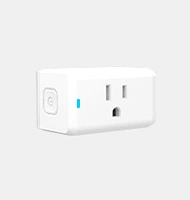
Pairing a Bluetooth Sensor with a Smartphone
In this section, we will describe the steps followed when pairing Bluetooth-compatible sensors using a smartphone. The Aventura receives the sensor pairing data together with the settings once the pairing process is complete.
a) Ensure that (Connect) is on, then from the (MENU) tap (Device)
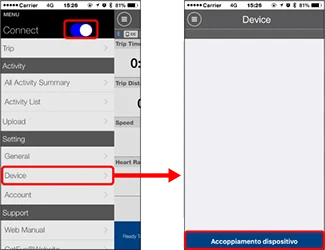
To search for pairable sensors, tap (Pairing)
b) Start the sensor
Once the Bluetooth smart sensor signal is detected, it displays a message on the smartphone.
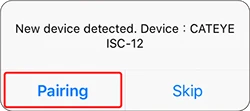
To complete the pairing process of the already displayed sensor, tap (Pairing).
- Press (Skip) if the gadget’s name is dissimilar from the expected, then tap (Pairing) again. Repeat this occasionally till the anticipated device is shown.
- When using the Bluetooth le sensor to pair, the sensor name is displayed with an “A.”
- Over 18 distinct sensor identifications, including the P.C, can be paired.
c) Establish the tire circumference for any sensor with speed measurements
Press (Device), and also tap the Sensor name > [Tire Circumference]. Tire circumference is the approximate length of the outer rim in each tire. Sensors that cannot measure speed are never displayed.
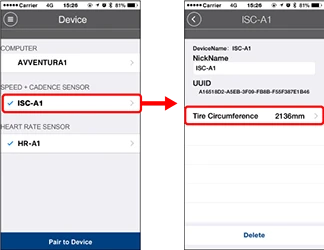
The tire size list is displayed once tapping is done. The tire circumference is selected per the tire size shown on the tire side.
- Original value: 2096 mm
- To any Bluetooth door sensor capable of speed measurements, it is recommendable to set the tire circumference.
- It is possible to cancel the pairing and changed the device names from this screen.
After following all those steps, the pairing process of the Bluetooth sensor is now complete.
- Repeat the same procedure when pairing with another Bluetooth sensor.
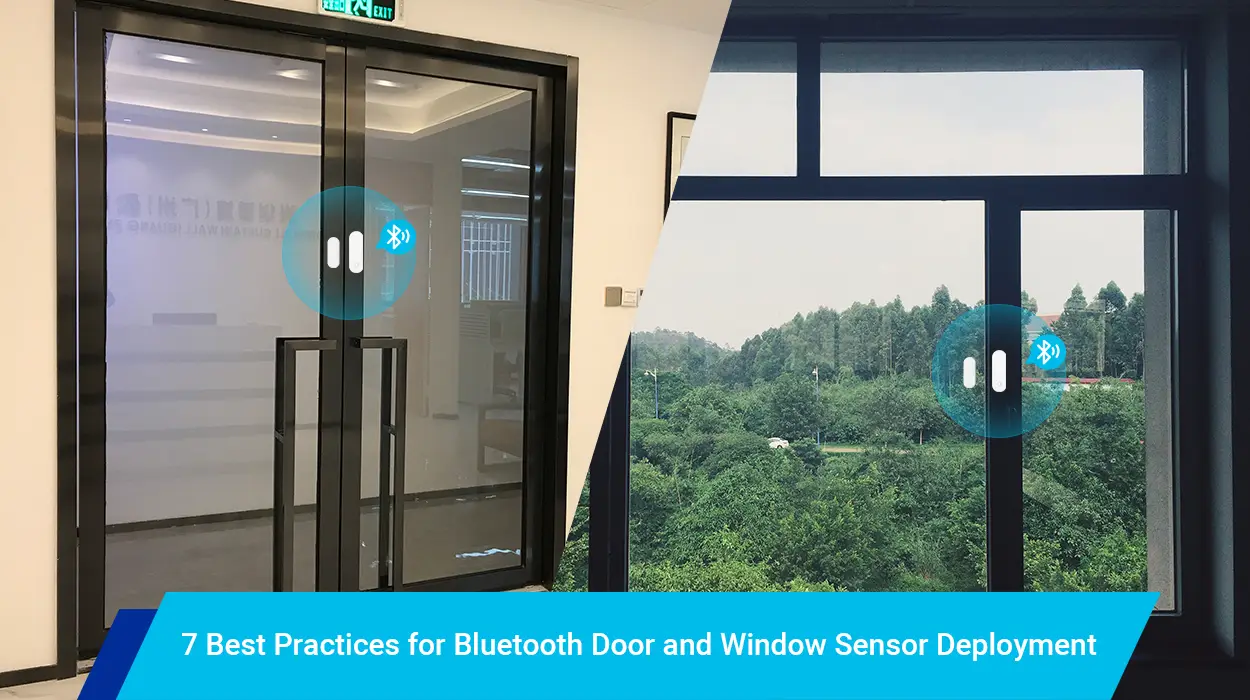
- After completing the pairing process, it is essential to mount the Bluetooth motion sensor close to you. Also, follow the guidelines written on the individual sensor’s instruction manual appropriately to determine the suitable place to mount the sensor.
Important Information
- Pair every usable sensor.
- Never pair Bluetooth smart sensors in the exact location or at any venue with many other users. Doing this can make the sensors pair up with other irrelevant devices. A Bluetooth mesh sensor can epitomize a sole physical BLE sensor.
- When working with third-party Bluetooth sensors, only an Android smartphone can transfer data to the Aventura, whereas an iPhone cannot.
Bluetooth Sensors Functionality
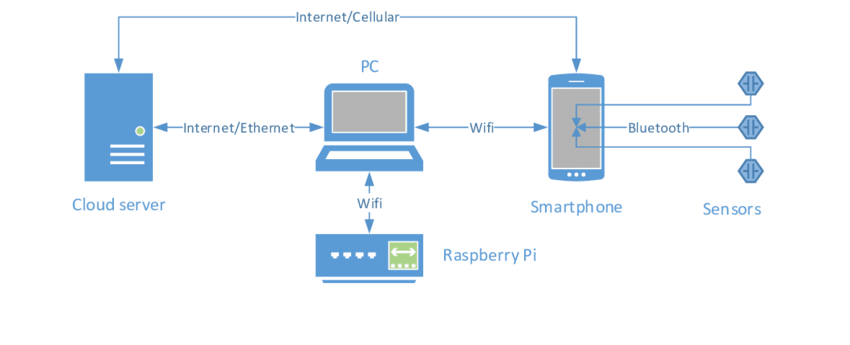
Bluetooth wireless sensors are insignificant, relatively cheap devices fitted onto or into an existing system. They are ideal for placement in remote areas or locations without power since they are battery-powered and wireless. Batteries last according to how often the sensors give report values, with some lasting even 5 years.
Besides, Bluetooth wireless sensors convey regular Bluetooth Low Energy publicity applied by commercial equipment, fitness trainers, and healthcare diplomacies. The publicizing information can be configured as iBeacon with bytes pack the recognized data in a patented format. Smartphones, gateways, or single-board computers, for instance, Raspberry Pi, can be used to grasp information once beacons are scanned. Scanning only sees the data broadcasted to everyone, but it does not link to the beacon.
Additionally, the scanning device termed as Bluetooth GATT connection enables a connection with some sensors. This permits the scanning device to notify whenever there is a change in values or view the present sensor values, allowing a large output of changes. However, advertising can be stopped by a connection; in so doing, other devices cannot connect since they cannot view the sensor.
The already built-in Bluetooth libraries enable the receipt devices to scan for beacons and link via GATT. Since communication is Bluetooth Low Energy, discrete sensors, specifically SDKs, are unnecessary. Also, there is no need to have subscriptions on the server-side stages.
Business Uses of Beacon Sensors
December 6, 2013, was when the first instance of the beacon was registered for business use. Up to date, iBeacons have been activated in its 254 retail stores across the United States by the Apple Company. Later, McDonald’s used the sensors in its stores to run special offers to its clients.
The Bluetooth Low Energy beacon sensors have numerous applications in various areas. The technology has numerous benefits, the main one being that it can send advertising and informational data to prospective clients. Generally, beacon sensors act as a bridge between the concepts, offering business information to clients. Multiple beacon sensors can be mounted inside an area, such as in airports, stores, institutions, clubs, public rooms, thereby broadcasting appropriate information to propinquity portable devices. Once the users receive the data, they can either use it for navigation purposes, react to the data, share the information, or other tenacities reliant on the message received.
Marketers can also use Bluetooth beacon sensors when connecting with probable clients. Businesses that use beacon sensors have higher chances of attaining targeting returns in brick-and-mortar standings. These beacon sensors offer several reimbursements to a business. They include;
- Beacons achieve more customer insight. For instance, a retailer learns how long it takes for a customer to make the next visit to the store. The seller also recognizes where exactly most clients spend in that particular store. The data can be helpful when updating advertising networks and applications or when retargeting a specific market.
- Beacons increase the loyalty of clients. Beacons provide promotion information through click-and-collect orders and by rewarding the physical presence of clients in the store.
- Sales increase. Using Bluetooth beacon sensors in line with its application rises the products and services orders. This is mostly seen in stadiums during sports events. Via beacons and the stadium’s application, visitors get into a position of receiving messages about food and beverage offers that endorses sales by times.
The options above do not naturally limit anyone on the use of Bluetooth Low Energy beacon sensors. Everything subject to creativity and fantasy.
Arduino: Reading and Controlling Sensor Data Using Bluetooth
This section aims at gathering sensor data from a simple temperature sensor then transmit it to a computer through Bluetooth communication. On one side of a computer, a simple Bluetooth sensor Arduino sketch must be written. It will later be uploaded on the Arduino board, assisting to time on the serial monitor and see the sensor data.
The following items must be available for the experiment to run smoothly
- Arduino uno Microcontroller
- HC-05 MOKOBlue Bluetooth module
- Temperature sensor
- USB cable
- Jumper Wires
- Breadboard
Step 1: Set Up the Circuit Connections
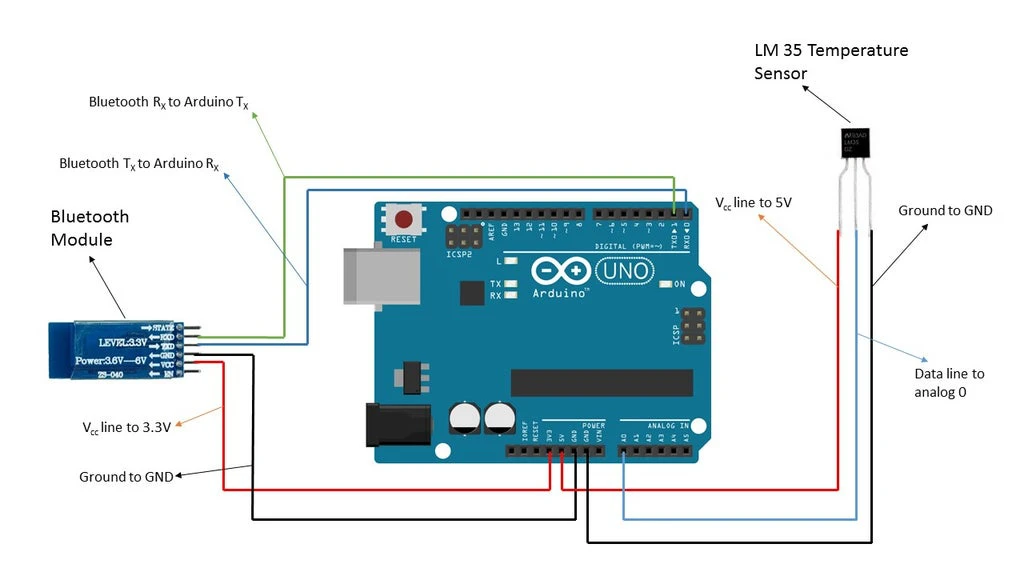
To begin the process, arrange the Arduino board circuit connections as in the diagram above. The Bluetooth connections between the Bluetooth module and the computer are established after making these connections.
A voltage divider circuit is used to connect the HC-05 Bluetooth modules to the voltage lines. The HC-05 may get damaged if it isn’t strong enough to sustain a 5V line. It is advisable to connect it to a 3.3V line, which keeps you on the safe side. The Bluetooth TX module is connected to the Arduino’s R.X, while the Bluetooth R.X pin module is connected to the Arduino’s TX pin.
Step 2: Establish Bluetooth Connections
After successfully setting up the circuit’s connections, you should be able to see a blink on the Bluetooth module signifying that it is operational and is ready for pairing with the P.C.
In case the computer you are using doesn’t have in-built Bluetooth, set up the connection with a Bluetooth dongle. If an inbuilt Bluetooth is present in the computer, go to the Contol Panel section and select -> Hardware and Sound -> the add a Device on the Bluetooth icon section on the taskbar. The computer should detect the HC-05 Bluetooth module and pair the computer with the HC-05 module. Use either ‘1234’ or ‘0000’ as the pairing code.
Step 3: Download Arduino Code
Open the Arduino IDE after successfully pairing the Bluetooth module. Download and understand the codes but do not include any special libraries.
Step 4: Upload Your Arduino Code
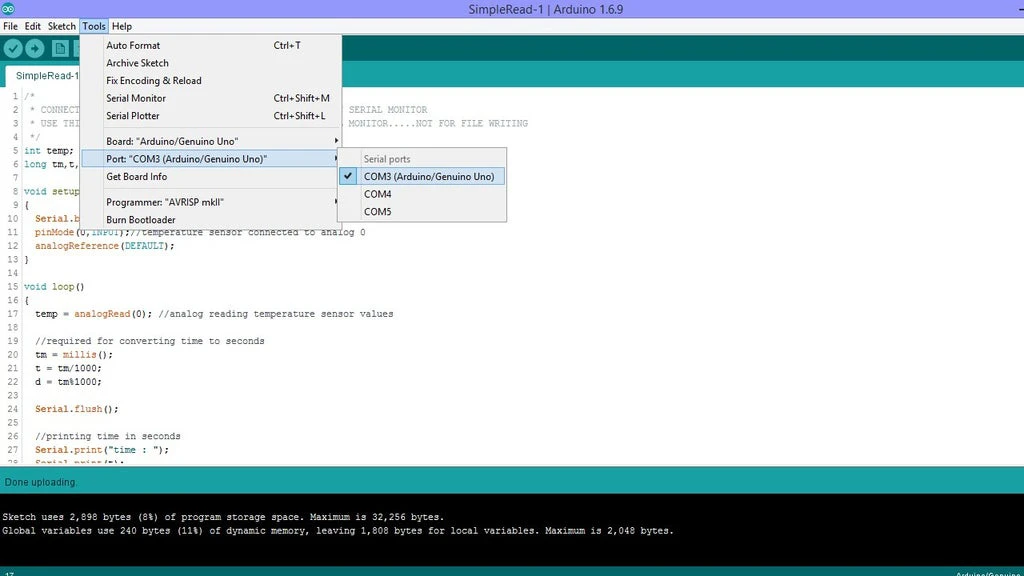
First, make sure you have well understood and verified your sketches before uploading. Make the necessary changes if there is any needed. After ascertaining the graphic, select the correct board and pick the right port to connect with the Arduino board. Then go to Tools -> Port and Tools -> Board correspondingly. To perform the procedure correctly, click the Arduino Uno to COM3.
After establishing the correct port and board, disconnect the R.X pins and the TX from the Arduino board, then upload your Arduino code. You are likely to get an error indicating the COM port is busy when you haven’t disconnected the TX and R.X. pins. Upload the code once you have disconnected, and connect the TX pins and the R.X. to their usual positions.
Step 5: Getting the Final Data
Connect the power source to the Arduino board and disconnect the USB cable connecting the Arduino board’s computer. With this setup, the Arduino board remotely gathers sensor data through Bluetooth communication is transferred to the computer with a USB cable.
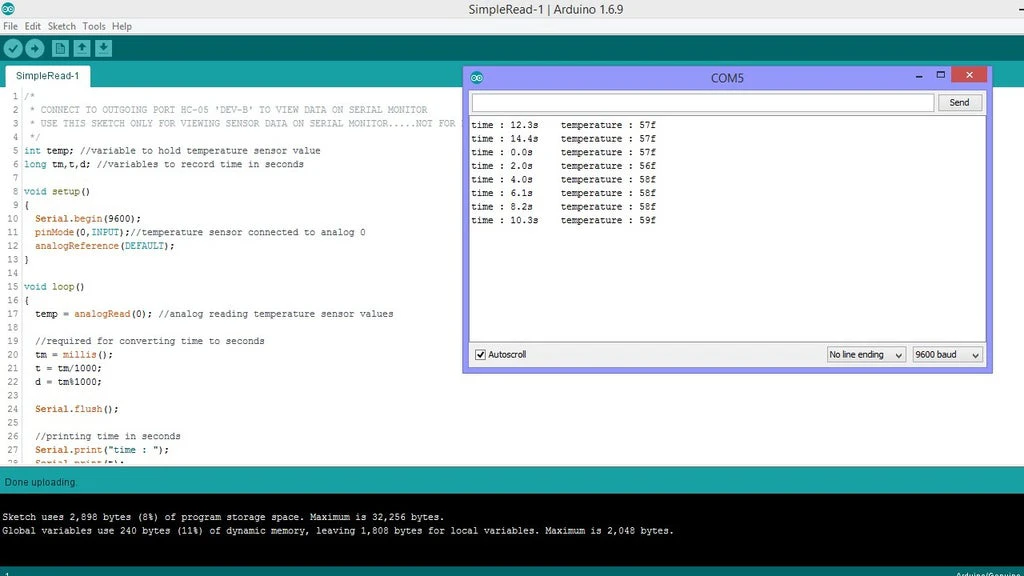
Next, establish which COM port connects the Bluetooth module to see the serial monitor’s sensor data. On the taskbar, click the Bluetooth icon and choose ‘Open Settings,’ then snap the ‘COM Ports tab.’ You should be able to see some COM ports connecting to the HC-05 module. Make sure you have carefully taken note of the ‘outgoing’ port, then go to the Arduino sketch and tap on Tools -> Port. Chose the port that parallels the ‘outgoing’ port. Once everything is set, open the port’s serial monitor where time and the temperature sensor data are displayed. Press the Arduino’s board rest button to assess data from zero seconds onwards.
Step 6: Troubleshooting
After noticing a time interval of 2 seconds in both time data on the serial monitor and temperature on the Bluetooth accelerometer sensor, know that everything is proceeding well. However, a slight delay of a few milliseconds may arise between the expected and normal successive readings while transferring data. You are more likely to encounter several problems and errors if you are new to using Arduino’s Bluetooth connection. To avoid any of these problems, make sure you have correctly followed the following points.
- Counter-check that the R.X pins and TX connections are firm and correct.
- Recheck that the Bluetooth module is well connected, and to be safe enough, use a voltage divider circuit or connect the HC-05 to the 3.3V. Never use the 5V.
- A loose connection may cause the Bluetooth module to stop working. Ensure there is a continuous LED blink on the Bluetooth module, indicating that it is powered.
- While uploading sketches, select the appropriate COM ports and boards. Besides, think of choosing the suitable Bluetooth module’s outgoing COM port to enable you to view the data on the serial monitor.
- As described in step 4, upload the sketches and remember to disconnect and reconnect when uploading the sketch.
- Make sure that the HC-05 Bluetooth module is within the range of your computer before experimenting with it.
Arduino Bluetooth communication is simple to connect when frequently used. Once someone gets comfortable with it, it becomes straightforward to send and receive data.